Header

However you spend your free time, make sure it's even more thyme well-spent!

Saturday, November 14, 2015

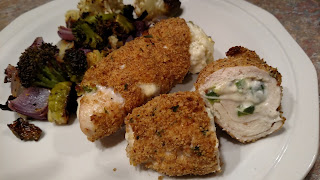
Jalapeno Popper Baked Stuffed Chicken

I've only recently discovered Skinny Taste and have saved several of her recipes to try. If the rest are anywhere near as good as this jalapeno popper chicken, I'll have many new dishes for the rotation.

Her process of dipping the chicken first in a combo of olive oil and lime juice then into whole wheat bread crumbs made for a crunchy, light coating over the juicy chicken and creamy filling.

These are the perfect way to indulge in game-day jalapeno poppers at dinner time!


Ingredients:
  • 2 slices center cut bacon, cooked and crumbled
  • 3 jalapeños, chopped (remove seeds for milder)
  • 3 oz 1/3 less fat cream cheese, softened
  • 4 oz reduced fat shredded cheddar jack (Sargento)
  • 2 tbsp chopped scallions
  • 8 thin sliced skinless chicken breast cutlets, 3 oz each
  • 1/2 cup Italian seasoned whole wheat breadcrumbs
  • 1 1/2 juicy limes, juice of
  • 1 tbsp olive oil
  • salt and fresh pepper
  • olive oil non-stick spray

Method:


  1. Wash and dry chicken cutlets, season with salt and pepper.  Preheat oven to 450°. Line a baking sheet with foil and place a baking rack (I used a cookie cooling rack) over the foil; spray rack with non-stick spray.
  2. Combine cream cheese, cheddar, scallions, jalapeño and bacon crumbles in a medium bowl.
  3. Lay chicken cutlets on a working surface and spread 2 tbsp of cream cheese mixture on each cutlet. Loosely roll each one, secure the ends with toothpicks to prevent the cheese from oozing out.
  4. Place breadcrumbs in a bowl; in a second bowl combine olive oil, lime juice, salt and pepper.
  5. Dip chicken in lime-oil mixture, then in breadcrumbs and place seam side down on a baking dish. Repeat with the remaining chicken. When finished, lightly spray the top of the chicken with oil spray.
  6. Bake 22-25 minutes, serve immediately.

Souce: Skinny Taste
Sunday, October 18, 2015

Goat Cheese Stuffed Artichoke Bottoms

I had no idea that artichoke bottoms were a thing until after I opened and drained a traditional can of artichoke hearts, made this recipe to a letter and ended up with a tasty but less than pretty appetizer. They looked nothing like the beautiful photos I was trying to replicate.

They tasted amazing, I assure you. But I was fascinated by the uniform, perfect cups in the picture and was on a mission.

And so I went in search of artichoke bottoms and for $28 (but free shipping, thanks to Amazon Prime) for six cans, I had them. And they made all the difference. (I would know - I made them three times in about a week and we enjoyed them as much each time.)


I made these for one of our monthly game nights, along with jerk chicken wings and jalapeno poppers. Everything was a hit, but these were among the first to go. And if anyone knows good food, it's this group - you work up quite an appetite strategizing over Jenga and stressing over the 5 Second Rule!


And so now I'm obsessed with these gorgeous vegetables, just waiting to be filled with any combination of stuffings. They are the perfect bite-sized nibble, easy to work with and beautiful to display. Enjoy!

Ingredients:

  • 2 cans (15-ounce) artichoke bottoms, drained and patted dry
  • 1 large log (11-ounce) goat cheese, room temperature
  • ½ cup freshly grated Parmesan cheese, plus more for topping
  • 4 cloves garlic, minced
  • 3 tablespoons chopped fresh chives
  • 2 tablespoons chopped parsley
  • salt and freshly ground black pepper
Method:
  1. Preheat oven to 375 degrees.
  2. Cut a thin slice from the bottom of artichokes to level and remove any remaining tough outer leaves. Spray a baking sheet with cooking spray.
  3. In a bowl, combine goat cheese, Parmesan cheese, garlic, chives, parsley and salt and black pepper to taste. Spoon filling into artichokes, sprinkle with additional Parmesan cheese.
  4. Bake for 15 to 17 minutes or until lightly browned and bubbling. Serve immediately.


Source: A Cookbook Obsession

Saturday, October 3, 2015

Herb-Roasted Fish in Parchment

I have long been a fan of Ina Garten and her recipes. Her cookbooks read like stories to me, and I love that she includes pantry tips, shopping sources and basic entertaining tips.

I have liked every one of her recipes I've tried (her Steakhouse Steaks and Shrimp Scampi are two of my favorites) and this was no exception. I couldn't believe how much flavor the olives gave the dish, and parchment kept the fish really moist even when fully cooked. Easy to put together and quick to cook - great weeknight dish with green beans almondine and roasted potatoes.


Ingredients:

For each serving (I made four) you'll need:

  • 8 ounces boneless fish fillet, such as snapper or cod 
  • ½ teaspoon kosher salt 
  • ¼ teaspoon freshly ground black pepper 
  • 1 tablespoon freshly squeezed lemon juice 
  • 1 tablespoon good olive oil 
  • 1 large sprig fresh thyme 
  • 2 Ceregnola or other large green olives with pits 
  • Extra-large egg 

Method:
  1. Preheat the oven to 400 degrees. 
  2. Place the fish fillet on a piece of parchment paper and sprinkle it with the salt and pepper. Drizzle the lemon juice and olive oil over the top of the fillet. Lay the thyme on top and place the olives next to the fillet. 
  3. Beat the egg together with 1 tablespoon of water for an egg wash. Brush the egg wash around the edge of the parchment paper and fold it in half. Carefully fold the edge of the parchment paper under and around the fish to make a package, then place the package on a sheet pan.
    • NOTE: To this point,  you can "Make it Ahead." Place the fish packets on the sheet pan and refrigerate until ready to bake. I put mine together before work then just popped them in the oven that evening.
  4. Bake for 12 to 15 minutes, until the fish is cooked through. Serve hot in the parchment paper. 

Source: Barefoot Contessa

Monday, September 7, 2015

Take Out Fake Out: Kung Pao Chicken

Here's another "take out fake out" recipe that is even better than the restaurant dish.

The original recipe calls for heating Japanese chili peppers (which we had to go to an international supermarket to find) in oil until they turned black. So I did. And Blue barked, Sambucca started sneezing and Brian had a strange coughing sneezing fit from the fumes, despite having the stove fan on turbo speed. AND, on top of all that, they didn't even give off that much heat! So, I pulled them from the oil and used a couple tablespoons of garlic chili sauce and it worked out great. I also threw in some extra vegetables. Finally, after reading the reviews on the original recipe, I doubled the sauce (original amounts are listed below) - that was a great call.

It would be great over rice, but we ate it as-is and it was filling and delicious.


Ingredients:

Marinade

  • 1 tablespoon soy sauce
  • 2 teaspoons Chinese rice wine or dry sherry
  • 1 1/2 teaspoons cornstarch
  • 1 pound boneless, skinless, chicken breasts or thighs, cut into 1-inch cubes

Sauce

  • 1 tablespoon Chinese black vinegar, or substitute good-quality balsamic vinegar
  • 1 teaspoon soy sauce
  • 1 teaspoon hoisin sauce
  • 1 teaspoon sesame oil
  • 2 teaspoons sugar
  • 1 teaspoon cornstarch
  • 1/2 teaspoon ground Sichuan pepper
  • 2 tablespoons peanut or vegetable oil
  • 1 medium red onion, sliced
  • 3 scallions, white and green parts separated, thinly sliced
  • 2 garlic cloves, minced
  • 1 teaspoon minced or grated fresh ginger
  • 2 tablespoons garlic chili sauce, or to taste
  • Florets from 1 crown of broccoli, steamed until crisp tender
  • 6 - 8 Brussels sprouts, trimmed and sliced length-wise, steamed until crisp tender
  • 1/4 cup unsalted dry-roasted peanuts


Method:
  1. Marinate the chicken: In a medium bowl, stir together the soy sauce, rice wine, and cornstarch until the cornstarch is dissolved. Add the chicken and stir gently to coat. Let stand at room temperature for 10 minutes.
  2. Prepare the sauce: In another bowl, combine the black vinegar, soy sauce, hoisin sauce, sesame oil, sugar, cornstarch, and cayenne pepper. Stir until the sugar and cornstarch are dissolved and set aside.
  3. Heat a wok or large skillet over high heat until a bead of water sizzles and evaporates on contact. Add the chicken and stir-fry until no longer pink, 2 to 3 minutes.
  4. Add the scallion whites, garlic, ginger and garlic chili sauce and stir-fry for about 30 seconds. Pour in the sauce, broccoli  and Brussels sprouts and mix to coat the other ingredients. Stir in the peanuts and cook for another 1 to 2 minutes. Transfer to a serving plate, sprinkle the scallion greens on top, and serve.

Adapted from: Epicurious

Friday, May 15, 2015

Take Out Fake Out: Pork Fried Rice


The last time a craving for old school Chinese food hit, we ended up spending a lot of money on greasy, pretty bland food. That was over a year ago and we were so disappointed that the craving just starting rearing its head again.
So last night, with some leftover roasted pork and Chinese restaurant white rice, I made my own pork fried rice. And just like that, the search for good take out has ended at my own stove.
This isn't really a recipe, since I didn't keep track of how much of this or that I threw in. But the bottom line is this: make you're own fried rice at home with whatever meat/veggies you have, make it as spicy - or not - as you like, as much or as little as you want...and you won't go back to the local take out joint anytime soon.
Here's what I did....
Chop left over pork - about 1 cup - and marinate in a tablespoon or so of teriyaki sauce.
Meanwhile, scramble two eggs in about a teaspoon of canola oil in a hot wok. Remove while still under done to a cutting board. Chop and set aside.
Warm a teaspoon each of canola and sesame oils in the wok and saute the pork.  After a few minutes, add about 1.5 cups cooked white rice. Stir to combine.  Next add a few sliced scallions and a generous handful of bean sprouts. Toss to combine and cook a few more minutes until veggies are warmed but not soft.
Now add a dash of soy sauce, some teriyaki sauce and a generous glug of chili garlic sauce. I may have been a little heavy handed on the latter...
Toss to combine so meat, rice and veggies are coated in the sauces. Off the heat, gently stir in the chopped scrambled eggs.
Dig in!!

Saturday, February 28, 2015

Take Out Fake Out: Sesame Shrimp Stir Fry

After not having had Chinese food in a very long time, we got take out a couple of months ago.And were completely underwhelmed by how greasy and flavorless the food was.

So when a "take out fake out" meal like this comes together in about 30 minutes, with crunchy vegetables, perfectly snappy shrimp and a nice kick, why would you risk a mediocre dinner at the local take out place?

Not surprisingly, we upped the cayenne and used soy sauce instead of teriyaki,bur that's it. The recipe as  written was just about perfect!


Ingredients:
  • 2 cups water
  •  1 cup uncooked white rice
  •  1 pound medium shrimp, peeled and deveined
  •  1/4 teaspoon ground ginger
  •  1 teaspoon cayenne pepper
  •  1 clove garlic, minced
  •  1 tablespoon sesame seeds
  •  1/4 teaspoon ground black pepper
  • 2 tablespoons sesame oil
  •  1 red bell pepper, sliced into thin strips
  •  3 green onions, sliced
  •  3 tablespoons soy sauce
  •  1/2 pound sugar snap peas
  •  1/8 cup cornstarch
  •  3/4 cup chicken broth
  •  1/4 teaspoon salt

Method:
  1. In a medium saucepan, bring salted water to a boil. Add rice, reduce heat, cover and simmer for 20 minutes.
  2. While rice is simmering, combine shrimp, ginger, cayenne pepper, garlic, sesame seeds and black pepper in a large plastic food storage bag. Allow to marinate in the refrigerator.
  3. Heat sesame oil in a large wok or skillet. Add red bell pepper and green onions; saute 3 to 4 minutes to soften slightly Add soy sauce. Add peas and shrimp with seasoning; saute 4 minutes or until shrimp are opaque.
  4. Stir cornstarch into chicken broth and add to wok; cook, stirring until mixture boils. Sprinkle with salt. Spoon shrimp mixture over rice.
Source: All Recipes

Monday, February 2, 2015

Taco Tuesday: Butternut Squash and Black Bean Enchilada Casserole

Brian's mom Sue's favorite meal at one of our regular haunts in Newburyport is a burrito made of spicy mashed sweet potatoes, black beans and cheese. I can't even remember where I first read this recipe, but as soon as I did, I knew Sue would love it.

At the same time, I'd been talking with my friend Kathy about some butternut squash recipes she'd found and wanted to try...one of which was similar to this one.

Finally, Brian is NOT a fan of squash, and I knew he wouldn't enjoy it.

So, just as I did with the Roasted Vegetable Lasagna, I made this in two smaller pans and gave them to Sue and Kathy.

Full disclosure: I haven't had a single bite of this casserole, except to try the filling before I put it all together. But I have it on great authority that it's "amazing...a keeper" and has "wonderful flavor" with great texture.  It sounds so good, I might make myself a pan and have it for lunches one week!


Ingredients:
  • 1 tablespoon olive oil
  • 1 medium onion, chopped
  • 1 tablespoon minced garlic
  • 1 jalapeño, diced (with seeds and ribs removed)
  • 3 cups butternut squash, peeled and diced
  • 1¼ cup salsa
  • ¼ cup chopped cilantro + plus more for serving
  • ½ teaspoon red chili powder
  • 1 teaspoon cumin powder
  • ½ teaspoon coriander powder
  • salt and pepper, to taste
  • ¼ cup water
  • 1 (15 oz can) black beans, drained and rinsed
  • 1½ cups red enchilada sauce 
  • 6 tortillas, cut into 1inch thick strips
  • 1½ cups monterey Jack or cheddar cheese
  • 3 scallions, chopped
Method:

  1. Heat the olive oil over medium high heat in a large skillet. Add the onions jalapeños and cook for 4-5 minutes until the onions become translucent, add the garlic and continue to cook for an additional 1 -2 minutes. Add the cubed butternut squash, salsa, cilantro, chili powder, cumin, coriander, water, and season with salt and pepper to taste. Cover and let cook over medium-low heat for about 30 minutes or until the squash is tender. Add the black beans and stir to combine.
  2. Position a rack in the center of the oven and preheat the oven to 400 degrees F.
  3. Put about a ¼ cup of enchilada sauce on the bottom of a large baking dish (divide all ingredients, as directed, between two 8" x 8" pans, if desired). Lay enough tortilla strips side by side to cover the surface. Place half of the filling over the tortilla layer, top with half of the remaining enchilada sauce and then half of the cheese. Repeat a second layer of tortillas, then the remaining butternut squash mixture, followed by the remaining enchilada sauce and finally layer on the remaining cheese.
  4. Bake the enchilada casserole or 10 - 15 minutes or until the cheese melts. Top with scallions and additional chopped cilantro. Serve with sour cream, if desired.
Source: Little Spice Jar