Header

However you spend your free time, make sure it's even more thyme well-spent!

Friday, December 5, 2014

Pork Chops alla Pizzaiola

The challenge with cooking for two is, in a word, leftovers. There are only so many times you can eat the same meal in a week and invariably some of it gets thrown out. So when I find a recipe for two that is delicious, satisfying and gone in one meal, it gets a prime spot in the recipe rotation.

I bought a jar of herbs de Provence just for this recipe and it's the only time I use it. And it's worth it. Don't skimp on this fragrant mixture...it has a flavor that is unique and interesting, and it goes really well with the pork and vegetables. I usually make some mashed potatoes to serve with the chops, but rice or couscous would work, too.


Ingredients:

  • 2 Tbsp. olive oil
  • 2 (1-inch thick) bone-in pork loin center-cut chops (about 12 oz. each)
  • Salt and freshly ground black pepper
  • 1 small onion, thinly sliced
  • 1 (15-oz.) can diced tomatoes, in juice
  • 1 tsp. herbes de Provence
  • 1/4 tsp. dried red pepper flakes, or more to taste

Method:

  1. Heat the oil in a heavy large skillet over medium heat. Sprinkle the pork chops with salt and pepper. Add the pork chops to the skillet and cook until they are brown and an instant-read meat thermometer inserted horizontally into the pork registers 160 degrees F, about 3 minutes per side. Transfer the pork chops to a plate and tent with foil to keep them warm.
  2. Add the onion to the same skillet and saute over medium heat until crisp-tender, about 4 minutes. Add the tomatoes with their juices, herbes de Provence, and red pepper flakes to taste. Cover and simmer until the flavors blend and the juices thicken slightly, stirring occasionally, about 15 minutes. Season the sauce, to taste, with salt and more red pepper flakes. Return the pork chops and any accumulated juices from the plate to the skillet and turn the pork chops to coat with the sauce.
  3. Place 1 pork chop on each plate. Spoon the sauce over the pork chops. Sprinkle with the parsley and serve.


Source: Food Network

Monday, December 1, 2014

Melting Snowmen Cookies

In anticipation of this year's cookie day, I've been scouring Pinterest and my saved recipes for the perfect combination of treats. Combine that with Santa's arrival - by Coast Guard boat - and the tree-lighting in Newburyport, and it's safe to say I've definitely got the holiday spirit.


Earlier this weekend, I stumbled upon these pictures from last year's baking extravaganza and thought they would be a good way to kick off the month. Super cute and really easy...and delicious!

Happy baking!


Ingredients:

For cookies:
  • Betty Crocker sugar cookie mix pouch, Pillsbury sugar cookie roll, or sugar cookie recipe of your choice - all prepared per package/recipe instructions (I used a Betty Crocker mix)
  • 10 - 12 medium marshmallows
  • Small tubes of decorating icing - I got black, blue, red and green
For icing:
  • 1 C powdered sugar
  • 4 tsp. milk
  • 1 tsp. clear vanilla extract (Be sure to use clear, otherwise your icing will be just a little off-color.)
  • 1 Tbsp. light corn syrup

Method:
  1. Preheat oven according to your package/recipe instructions.
  2. Take a small chunk (about the size of a golf ball) of the cookie dough and flatten to about 1/4″-1/2″ depending on how thick you like your cookies. Remember, they are supposed to be melted snowmen so the more irregular the shapes are, the better the final product will be!
  3. Bake according to your package/recipe instructions. Cool completely before continuing. (Next time, I'd put a piece of paper towel or parchment under the cooling rack to catch the run-off icing.)
  4. Once the cookies have cooled, stir all icing ingredients until smooth and ice your cookies, letting some of the icing extend over the sides. Note: The frosting doesn’t get hard like a Royal Icing does, but it stays soft and shiny.
  5. While icing is setting, lightly spray a  microwave-proof plate with cooking spray. Place the marshmallows on the plate and microwave on high for about 15-20 seconds. Watch them carefully, you don’t want to let them get too fluffy.  Spray your hand with the cooking spray and pull the marshmallows carefully off the plate, setting one on each of the frosted cookies.
  6. Now - decorate your cookies! We found it easiest to draw the faces and arms first, then go back and do the buttons and scarves. 
  7. Store carefully, as the icings do not get fully dry.

Source: My Imperfect Kitchen

Sunday, November 30, 2014

Sausage Stuffed Mushrooms


Just as we've all recovered from our tryptophan-induced food comas from Thanksgiving, I figured it was a good time to share the Sausage Stuffed Mushrooms I made for our appetizer.

I've made several different stuffed mushrooms over the years - some with sausage, others with crab, some with just cheese - but I've never before seen a recipe call for marinating the mushroom caps before stuffing them. Doing so made for a really tender, flavorful vegetable that held up to and complimented the rich stuffing mixture. It was an easy way to set these apart from others I've had.

Enjoy!


Ingredients:
  • 1 package extra-large white mushrooms, about 20 total
  • 3 Tbsp. olive oil
  • 2 1/2 Tbsp. red wine - I used a Pinot Noir we had open
  • 3/4 lb. sweet Italian sausage, removed from the casings
  • 6 scallions, white and green parts, minced
  • 2 garlic cloves minced
  • 2/3 C panko crumbs
  • 6 oz. mascarpone cheese
  • 1/3 C freshly grated Parmesan
  • 2 1/2 Tbsp. minced fresh parsley leaves
  • Salt and freshly ground black pepper
Method:

  1. Preheat the oven to 325 degrees F.
  2. Remove the stems from the mushrooms and chop them finely. Set aside. Place the mushroom caps in a shallow bowl and toss with the olive oil and wine. Set aside.
  3. Spray a medium skillet with cooking spray and heat medium heat. Add the sausage, crumbling it with the back of a wooden spoon. Cook the sausage for 8 to 10 minutes, stirring frequently, until it's completely browned. Add the chopped mushroom stems and cook for 3 more minutes. Stir in the scallions and garlic and cook for another 2 to 3 minutes, stirring occasionally. Add the panko crumbs, stirring to combine evenly with all the other ingredients. Finally, swirl in the mascarpone and continue cooking until the cheese has melted and made the sausage mixture creamy. Off the heat, stir in the Parmesan, parsley, and season with salt and pepper, to taste, Cool slightly.
  4. Fill each mushroom generously with the sausage mixture. Arrange the mushrooms in a baking dish large enough to hold all the mushrooms in a snug single layer. Bake for 50 minutes, until the stuffing is browned and crusty.

Source: Ina Garten / Food Network

Sunday, November 23, 2014

Antipasto Appetizer

In honor of our first anniversary in our house, we had some great friends and family over for appetizers and cocktails, with a few desserts thrown in. Several people had offered to bring a dish and it turned into a decadent pot luck. My favorite kind of party!

My contributions were all those meatballs I had made - Italian turkey with sauce and Swedish - and this super-simple, quick-to-disappear antipasto platter.


Using the original recipe for inspiration, I put together all the things I love about an antipasto. You can add just about anything and everything that sounds good to you - or that you have in the fridge. Here's what I used...

Ingredients:

  • 1 jar marinated artichokes, including marinade
  • 1 jar green olives with pimentos, drained and rinsed
  • 1 can sliced hearts of palm, drained and rinsed
  • 1 can "baby" corn, drained, rinsed and halved
  • 1 medium sized jar roasted red peppers, drained and chopped
  • 1 container grape tomatoes
  • 1 small package button mushrooms, quartered
  • 1 small container bocconcini (small balls of mozzarella)
  • 1 block of Colby Jack cheese, diced
  • 1 hard salami, diced
  • 1 packet of Good Seasons garlic & herb salad dressing, prepared according to package directions
Method:
  1. About three hours prior to serving, combine all ingredients in a container large enough for them to be tossed freely.
  2. Cover container and gently rotate until all ingredients are coated in the dressing.
  3. Refrigerate, rotating occasionally, for three hours.
  4. To serve, transfer antipasto to a platter with a slotted spoon. Spear several pieces of antipasto with toothpicks and provide additional toothpicks for serving.


Source: The Flirty Guide

Monday, November 17, 2014

Taco Tuesday: Mexican Brownies

In honor of Kevin's 70th birthday, I'd been trying to recreate a favorite dessert from one of our favorite restaurants on Plum Island: a Mexican brownie. Not only did I find the perfect sweet & spicy combo, I learned it's so easy - and oh, so much better - to make brownies from scratch that I'll never buy another boxed mix!

I made the recipe as originally written the first time and there wasn't even a hint of heat. The second time, I doubled the amounts of cinnamon and cayenne and it still wasn't what I was looking for. I've settled on a tablespoon of each - for us, there's a good kick that sort of catches up with you as make your way through a brownie.

Mexican or traditional, this will be my go-to brownie recipe from here out.


Ingredients:
  • 2 sticks unsalted butter
  • 2 C sugar
  • 4 large eggs
  • 2 tsp. vanilla extract
  • 2/3 C good-quality unsweetened cocoa powder
  • 1 C all-purpose flour
  • 1 Tbsp. ground cinnamon
  • 1 Tbsp. cayenne pepper
  • 1/2 teaspoon kosher salt
  • 1/2 teaspoon baking powder
Method:
  1. Preheat the oven to 350 degrees. Line a 9-by-13-inch baking dish with parchment paper, leaving an overhang on two sides. Press the paper into the corners of the pan and lightly cover with non-stick spray.
  2. Melt the 2 sticks of butter in a nonstick saucepan over medium-low heat; do not boil. Remove from the heat and let cool but don't allow it to solidify at all. Add the sugar, eggs and vanilla to the saucepan and stir with a wooden spoon until combined.
  3. Add the cocoa, flour, cinnamon, chili powder, salt and baking powder to a mesh sieve and sift over the butter and sugar mixture. Mix with a wooden spoon until smooth. Spread the batter in the prepared pan and bake until a toothpick inserted in the middle comes out fudgy, 20 to 25 minutes. Cool in the pan on a rack, then use the parchment paper to lift out the brownies before slicing.
Source: Food Network

Tuesday, November 11, 2014

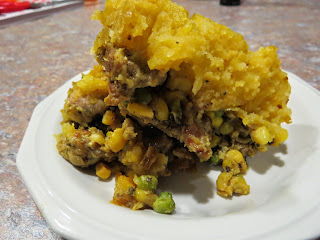
Not-Your-Mom's Shepherd's Pie

Before we get started, two disclaimers:

1. This is not your mom's or your grandmother's shepherd's pie.
2. It's better.

Oh, wait - three things:

3. Shepherd's pie does not translate well to photos. They just do. not. do. it. justice. 


All of that aside, this dish is outstanding. Adding squash and a sweet potato to the traditional white potato makes the potato topping lighter and at the same time more filling than you're used to. Add a little butter and maple syrup - and it's like dessert with dinner.

I love an "old fashioned" shepherd's pie with ground lamb. I do. But I do have a soft spot for Italian sausage. Throw in some peas and corn and it's a nod to tradition...but then, when you sprinkle in some curry, it adds warmth and depth that can't be replicated.

Now, marry the sweetness of the potato mixture with the slight spiciness of the sausage with the warmth of the curry. Addictive.

I hope you enjoy this updated version of an old-time favorite as I do!

I told you it wasn't pretty...


...but boy, is it delicious!

Ingredients:

  • 1 1/2 lbs. tan-skinned sweet potatoes, peeled, cut into 2-inch pieces 
  • 1 lb. butternut squash, peeled, seeded, cut into 2-inch pieces 
  • 1 medium russet potato, peeled, cut into 2-inch pieces
  • 2 T (1/4 stick) butter
  • 2 T pure maple syrup
  • 1 1/2 lbs. sweet Italian sausage, casings removed
  • 2 cups chopped onions
  • 1 T minced garlic
  • 3/4 C frozen peas
  • 3/4 C frozen corn kernels
  • 1/3 C whipping cream
  • 1 large egg, lightly beaten
  • 1 1/2 tsp. curry powder
  • 1/2 tsp. ground coriander
  • 6 drops hot pepper sauce
Method:

  1. Cook sweet potatoes, squash and russet potato in large saucepan of boiling salted water until tender, about 25 minutes. Drain. Put potatoes and squash through a ricer, into the same saucepan. Stir over medium heat until excess moisture evaporates, about 5 minutes, being careful not to scorch. Add butter and syrup. Season to taste with salt and pepper. Stir to combine.
  2. Preheat oven to 350°F. Spray a 8 x 8 x 2-inch glass baking dish or large oval Pyrex baking dish with cooking spray, liberally. Cook sausage in large skillet over medium-high heat until sausage is brown and cooked through, breaking up with back of spoon, about 10 minutes. Using slotted spoon, transfer sausage to large bowl; reserve 1 tablespoon of drippings in skillet. Add onions and garlic to skillet and sauté over medium-high heat until onions are tender and golden, about 7 minutes. [Note: deglaze pan with a tablespoon or two of stock or wine, if necessary.] Add onion mixture to sausage. Season to taste with salt and pepper. Cool. Beat egg with cream, curry powder, coriander and hot sauce in a small bowl. Mix egg mixture with peas and corn into sausage mixture.
  3. Transfer sausage mixture to prepared baking dish. Spoon mashed potato mixture over; smooth top. (Can be prepared 1 day ahead. Cover and refrigerate.) Bake until heated through and potatoes begin to brown around edges, about 45 minutes (or about 1 hour for casserole that has been refrigerated). Let stand 5 minutes before serving.
Source: Epicurious

Friday, November 7, 2014

Turkey Meatballs

This is the second time I've made these meatballs--they were such a hit the first time, I tripled the batch (twice) for a get-together we're having in a few weeks. The recipe as written below is the original measurements, with my additions/changes.

The major change I made was to roast my meatballs as opposed to pan frying them. So much cleaner and faster - I was able to get all the meatballs on four baking sheets, then bake two at a time.

For a get together, I'll add the frozen meatballs to a crockpot with some jarred sauce for a few hours - they're delicious as-is or on a small roll with some Provolone cheese.

(I also made a batch of these Swedish meatballs for the same party. Yes, your math is correct: there are currently nine pounds of meatballs in my freezer. Hope everyone comes hungry!)

There may have been some sampling - aka quality control - going on as the meatballs cooled.

We pulled out a few from one batch to have meatball sandwiches for lunch - so good. I think I'll make another few pounds so we always have some on hand.


Ingredients:
  • 1/4 C plain dried bread crumbs
  • 1 small onion, finely dices
  • 3/4 C grated Romano
  • 2 T parsley, finely chopped 
  • 2 T whole milk
  • 2 large eggs, lightly beaten
  • 1 lb. ground turkey, preferably dark meat
  • Salt and freshly ground black pepper
Method:
  1. Preheat oven to 400.
  2. Line four baking sheets with foil and spray with baking spray.
  3. In a large bowl, toss crumbs, onion, cheese and parsley. Add the turkey and mix lightly.
  4. In a small bowl, beat the egg and half and half together. Add to turkey mixture and gently combine, being careful not to overwork the meat. Season with salt and pepper. 
  5. Shape into golf-size balls.
  6. Place on prepared sheets, leaving an inch between each meatball.
  7. Roast for 15 minutes or until cooked through.
  8. Cool on racks, then serve or place in freezer bags and freeze for later use.
Source: Food Network

          Saturday, October 18, 2014

          Lasagna Bolognese

          If you've been reading my posts for a while, you know that I love this Bolognese sauce and think this one is good, too. And I really, really love lasagna...but I've only posted short cut recipes like this or that (and no recipe is as good as my brother Eric's).

          So you can imagine my delight to come upon a recipe for Lasagna Bolognese: the perfect marriage.

          It's a little different than what I think of as a traditional lasagna. It calls for only Parmesan cheese and includes a bechamel sauce, which I'd never made before. And it wasn't as saucy as I generally prefer, but that's an easy fix...make more sauce!

          And, let's be clear: this is no short cut recipe. Like any lasagna, it was a little labor-intensive, but was a perfect Sunday-Funday recipe and dinner. (Oh, and I had to convert the original grams to ounces and pounds...so the measurements aren't exact, but they're close enough.)


          Ingredients:
          FOR THE BOLOGNESE SAUCE

          • 2 slices of bacon, diced
          • 2 medium onions, chopped
          • 2 cloves of garlic, chopped
          • 2 carrots, chopped
          • 2 sticks of celery, chopped
          • Olive oil
          • 2 heaped teaspoons dried oregano
          • 1 lb. ground beef beef
          • 1 28 oz. can of chopped tomatoes
          • Sea salt and freshly ground black pepper
          • A small bunch of fresh basil, leaves picked and stalks chopped


          FOR THE LASAGNE

          • 8 oz. dried lasagna sheets (I used the no-cook noodles and they were great)
          • 1 large ripe tomato, sliced


          FOR THE BECHAMEL SAUCE

          • ½ a small onion, thinly sliced
          • 2 C milk
          • a sprig of fresh parsley
          • a pinch of nutmeg
          • 6 black peppercorns
          • optional: 1 bay leaf
          • 1 Tbsp. butter
          • 1 Tbsp. plain flour
          • 2 oz. Parmesan cheese (I don't have a scale so I finely grated a bunch of cheese and used about 1/2 C in the sauce)
          • sea salt and freshly ground black pepper


          Method:
          Start the Bolognese...

          1. Place a large saucepan on a medium to high heat. Add 2 lugs of olive oil, your sliced bacon and the oregano and cook and stir until the bacon is lightly golden. Reduce the heat to medium-low and add the vegetables to the pan.
          2. Stir occasionally for around 15 minutes, or until softened and lightly colored then stir in the beef and the tomatoes. Add water to tomato can until about half full then add to the pan. Stir in a good pinch of salt and pepper. Add the chopped basil stalks to the pan. (Save the leaves for later).
          3. Bring to the boil. Turn the heat down and simmer with a lid on and slightly askew for 1 hour, stirring every now and again. Take the lid off and cook for another 30 minutes, stirring occasionally. Keep an eye on the sauce as it cooks, and if you think it’s starting to dry out, add a splash of water. 
          While the sauce is cooking, start the bechamel...

          1. Add the onion, milk, parsley, nutmeg and black peppercorns and bay leaf (if using) to a pan on a medium heat and gently bring to the boil – keep a close eye on it as milk can boil suddenly. Strain the milk through a sieve, discarding anything left behind. Melt the butter in another pan on a medium-low heat. Mix in the flour.
          2. Start adding the strained milk, a ladleful at a time, stirring each addition in before adding more. When you have a smooth white sauce, bring to the boil then simmer for a couple of minutes. Take off the heat and finely grate in most of the Parmesan cheese. Mix well then season with a pinch of salt and pepper.
          Put the lasagna together...

          1. Preheat the oven to 375°F. Remove the Bolognese sauce from the heat, then tear and stir in any larger basil leaves, keeping the smaller ones aside for later. Have a taste of the sauce, and season with a little more salt and pepper if you think it needs it.
          2. Spoon a third of your Bolognese sauce into the bottom of an earthenware ovenproof dish (approximately 9" x 13"). Follow with a layer of lasagna sheets and another third of your Bolognese sauce, then spoon over a third of your white sauce. Top with another layer of lasagna sheets. Spoon over the rest of the Bolognese sauce and another third of the white sauce.
          3. Finish with a final layer of lasagna sheets and top with the rest of the white sauce and finely grate over the remaining Parmesan. Top with some slices of tomato, scatter over the small basil leaves and drizzle with olive oil. Cover with foil, place in the preheated oven and bake for 30 minutes. After that, remove the foil and cook for a further 20 minutes until the lasagna is bubbling and golden. Allow to cool slightly before slicing and serving.


          Source: Kung Food

          Thursday, October 16, 2014

          Plum Island Vacation 2014

          Brian and I didn't take a traditional week's vacation this summer, but were fortunate to spend several long weekends on Plum Island.

          Hope you enjoy a look into our favorite place in the world!

          I swear the boys know where we are as soon as we cross the little bridge onto PI.

          Sunset...
          ...sunrise.


          My favorite of the summer.


          Pat took this on the way home...sleepy kids are happy kids!

          I took this photo totally by accident: the camera was sitting on the table, I meant to turn it off and hit the shutter instead. The glass says "The Beach is Calling" and I love how you can see the flags. Nice end to Labor Day weekend...

          One of my favorite things about PI is the amazing sun sets. We spent Columbus Day on island and had a front row seat.

          After a rainy Saturday, Sunday was gorgeous.

          Starting to set.

          Going...

          ...going...

          ...gone.


          Sunday, October 12, 2014

          Buffalo Chicken Pinwheels

          I've made veggie and ranch dressing pinwheels (like these) for years. It's an incredibly versatile recipe and you can use any combo of veggies you have on hand.

          I've also enjoyed buffalo chicken dip at parties, as great bar food, and out of my own kitchen.

          But I never thought to put the two together. So glads someone else did!


          Ingredients:
          • 8 ounces cream cheese, softened
          • 1/2 cup hot wing sauce or cayenne pepper sauce
          • 1/4 cup blue cheese, crumbled
          • 1 cup colby-jack cheese, shredded (4 ounces)
          • 1/4 cup green onions, finely chopped
          • 1 pound chicken breast, cooked and shredded
          • 5 large flour tortillas (approximately 10 1/2" diameter)
          • Optional: celery sticks, carrot sticks, blue cheese dressing
          Method:
          1. In a bowl, beat cream cheese on low and add in sauce, blue cheese, colby-jack cheese, and green onions. Beat until blended.
          2. Stir shredded chicken into mixture by hand.
          3. Spread approximately 3/4 cup of mixture on top of one of the tortillas. Roll up tortilla tightly, but without shifting the mixture too much. Repeat with remaining tortillas. Place rolled tortillas on a place and cover with plastic wrap. Refrigerate for 2-4 hours. (I used about half of these the first night I made them and after having been in the fridge for a few hours they were perfect; I tried to serve the rest of them a couple of nights later and the tortillas had become gummy and I had to throw them away. Moral of the story: I believe the filling would keep well for several days in the fridge, so only make as many pinwheels as you'll use right away.)
          4. Remove from refrigerator and unwrap. Slice each rolled tortillas in half and then each half into 3 slices, discarding ends. Place pinwheel slices on serving plate or tray and serve with celery and/or carrot sticks and extra blue cheese dressing for dipping, if desired.
          Source: Home Cooking Memories

          Sunday, October 5, 2014

          Asparagus in Phyllo Dough

          I had never worked with phyllo before, and the original recipe explained that you need to keep the rest of the thawed dough covered with "damp paper towels" to keep it from drying out. The first time I made these, my paper towels weren't damp enough and the dough did get a little dry; the next time, the towels were too damp and made the top piece of dough very gummy. Neither really changed the way the appetizers turned out - crispy, a little tangy from the cheese and mustard, and completely addictive - but I clearly need more practice working with phyllo.

          What a pity.


          Ingredients:

          • 1 bunch of asparagus (I had 42 thin spears in my bunch), washed and dried
          • 1 roll thawed phyllo sheets (best way to thaw is to put a roll in your fridge the night before)
          • 4 tablespoons of butter, melted
          • ¼ cup good mustard (I used Dijon)
          • salt (the salt is optional - omit if you are using a salty cheese)
          • freshly ground pepper 
          • 4 tablespoons Asiago Cheese, grated (or whatever kind of cheese you like)
          Method:

          1. Trim the tough ends off the asparagus spears. 
          2. Unroll the thawed phyllo sheet roll on your counter and place a couple of damp paper towels over the top so they don't dry out.  
          3. On a large cutting board, place two of the phyllo sheets. Brush some melted butter over the entire top sheet. Brush some of the mustard on the sheet.  Sprinkle with a little salt (if you are using) and the pepper.  Sprinkle a heaping tablespoon of the cheese all over the sheet.  
          4. With a very sharp paring knife, cut the sheet in half.  Cut each half in half.  Place two asparagus spears on each piece of phyllo and roll up.  Place on a parchment (or foil) lined baking sheet.  Brush the tops with some melted butter and sprinkle additional seasoning on top. 
          5. Repeat until all your asparagus is used.  You can refreeze any unused phyllo sheets if you want, as long as you haven't let them dry out.  Just roll up with plastic wrap and seal tightly. 
          6. At this point, you can cover with plastic wrap and place the baking sheets in the fridge until you are ready to bake them. You can even assemble these the day before.  When you are ready to cook them, bake them in the oven at 375° F for about 15 - 20 minutes until golden brown. 
          7. Serve warm or at room temperature.  Serve extra mustard on the side for dipping if you want. 

          Thursday, September 4, 2014

          Grilled Corn Salad with Tomatoes, Basil and Hard Cider Vinaigrette

          With grilled corn and a hard cider dressing, this easy, flavorful salad makes for a timely transition from summer to fall. It's sweet, crunchy, and a little tangy and made a great, fresh salsa for grilled swordfish.

          Enjoy!


          Ingredients:

          For the Vinaigrette:

          6 ounces hard cider (I used Angry Orchard)
          1 tablespoon honey
          2 tablespoons white wine vinegar
          1 1/2 teaspoons Dijon mustard
          Kosher salt and black pepper
          1/3 cup olive oil

          For the Salad:

          3 ears of corn, steamed (I used a few ears left over from the night before)
          1 large tomato, finely chopped
          1 medium red onion, finely chopped
          1/4 cup basil, cut into ribbons

          Method:

          1. Add the hard cider and honey to a medium saucepan over medium-high heat. Bring to a simmer and cook for 5 minutes, stirring, until the mixture has reduced by about a quarter. Remove from heat. Whisk in the vinegar and mustard. Season with salt and pepper. Slowly add in the olive oil in a steady stream, whisking until the vinaigrette is emulsified. Reserve.
          2. Warm a non-stick skillet over medium heat.
          3. Cut corn from cob and dry saute in heated skillet until toasted and starting to take on some color. Allow to cool slightly.
          4. Combine corn, tomato, onion and basil in a medium bowl. Toss with vinaigrette, to taste. Season with freshly cracked pepper. Taste and season with salt, if needed. Toss again, and serve immediately.
          Note: The original recipe had you starting with fresh corn that you grilled in the husk. I'd love to try that, but the leftover method worked great, too.

          Source: Serious Eats

          Saturday, August 9, 2014

          Shrimp Jalapeno Burgers

          You're going to start to think I don't like traditional beef burgers...and that's really not true. But, I do get to a point each season where I'm tired of cooking and eating the same old thing and am looking for something different.

          Even after being put through a food processor, the shrimp held some of their texture and cooked up exactly like whole shrimp taste and feel. There was a nice kick from the jalapeno, and no single taste overpowered any of the others. I didn't have an avocado, so I used a little mayo on each "burger" and it added a nice amount of creaminess.

          I think these would make nice sliders on small, sweet Hawaiian rolls. I think you'd get about 12 from this recipe; if I try it out, I'll let you know.


          Ingredients:
          • 1 lb shrimp, peeled and deveined (weight after peeled)
          • 1 large jalapeño, minced 
          • 1 garlic clove, minced
          • 3 medium scallions, chopped
          • 2 tablespoons fresh cilantro, chopped
          • 2 tablespoons panko 
          • 1/4 teaspoon sea salt
          • 1/8 teaspoon fresh ground black pepper
          • 4 lime wedges
          • 1/2 medium avocado, sliced thin
          • 4 hamburg rolls, toasted
          Method:
          1. Dry shrimp well with a paper towel then place them in the food processor along with jalapeño and garlic. Pulse a few times until almost pasty.
          2. Combine the shrimp in a large bowl with remaining ingredients and mix well to combine.
          3. Form shrimp into 4 patties.
          4. Heat the oil in a cast iron skillet over medium heat. Add the shrimp cakes to the heated pan and cook 4 minutes without disturbing, then gently flip and cook an additional 4 minutes.
          5. Serve with fresh lime juice and top with thin slices of avocado.
          Source: Skinny Taste

          You might also like: Herb Shrimp Scampi, Starve a Fever, Feed a Cold (Shrimp Scampi with Linguini) 

          Sunday, August 3, 2014

          A Perfectly Poached Egg

          I was working from home the Thursday morning that Brian sent me a link to this article: How to Make Perfect Poached Eggs, Every Single Time. It was perfect timing: I was hungry, I had 10 minutes to spare, and there was one egg left in the fridge.

          I had tried unsuccessfully to poach eggs before. I had tried using a saucepan and ended up with loose, webby whites and over- or under-cooked yolks. I bought an egg poacher insert like this one, but never got the timing right. Cooking them in the microwave resulted in uneven cooked yolks and whites.

          But I love poached eggs, so I read the article Brian sent and following the instructions exactly. And the eggs were perfectly poached. The yolk was creamy and hot, and the whites were set but not overcooked. Success!


          Ingredients:

          For each egg you want to poach,  you'll need:

          • A fresh egg 
          • 1 tsp. white vinegar
          • 1 heavy pinch of salt


          Method:

          1. Select a wide, shallow pan. You don't want to let your eggs get crowded or bump into each other, which can cause the whites to feather and go loose. You want enough water, both breadth- and depth-wise, so they can move around, which the boiling water will encourage. For one egg, I used a medium saucepan; I poached four in a 3" deep, 12" wide saute pan.
          2. Let the water come to a gentle, not furious, boil. The water should be bubbling merrily along, with small, even bubbles—but it shouldn't be a full, roaring boil and spitting up little flecks of burning hot water. Once the water has reached a full, roaring boil, turn the heat down to medium or medium-high, depending on your stove. That way you know the water's hot enough, but it will calm down after a minute or two.
          3. Meanwhile, crack each egg into its own shallow bowl or small cup with a handle. I used my handled measuring cups.
          4. Next, add the vinegar and salt to the boiling water.
          5. Once your water is ready, hold the bowl close to the surface of the water or even slightly below and gently slide them in.
          6. Cook for exactly 3.5 minutes. Set the timer. I've tested this three times and it's the perfect amount of cooking time, regardless of how many you are cooking.
          7. As soon as the timer goes off, turn off the heat and remove each egg with a slotted spoon. Drain briefly on a piece of paper towel before serving. 


          Source: Food Hacks


          Monday, July 28, 2014

          Salmon Burgers with Avocado Aioli

          Holy. Moly.

          I cannot believe that so few ingredients can come together so deliciously. There's really not much to either the burger or the aioli - the burger is just fresh salmon, salt, pepper, and chives. But there is so much flavor in every. Single. Bite.

          The original recipe called for a serrano pepper, but our grocery store didn't have any. So Brian picked up some  habaneros. I started with half of one, seeded, and ended up using one and a half, seeded, total. I would likely go with two next time, but we like a lot of spice.

          Full disclosure: You're going to need both a food processor and a meat grinder. That may not seem like the best choice for a Monday night dinner, but trust me - it's worth. I'll never buy a frozen salmon burger again!


          Salmon Burgers

          • 1.5 lb. boneless, skinless salmon filet
          • 3 T chives, minced
          • Pinch kosher salt
          • 1 1/2 tsp. freshly ground black pepper
          • 1/2 small red onion, thinly sliced
          • 4 burger buns, toasted
          • Avocado aioli, recipe below
          • Canola oil, for grill pan
          1. Cut the salmon into pieces and freeze for about 20 minutes. Pass the chilled salmon through the coarse setting of a meat grinder.
          2. Season the ground salmon with salt, pepper and chives, then mix to combine. Form the salmon into 4 equal-sized patties.
          3. Add a teaspoon or two of canola oil to cast iron skillet and preheat to high. Grill the patties for 3 - 4 minutes; flip and cook another 2 - 3 minutes.
          4. To assemble the burgers, spread some of the aioli on the bottom bun, top with a burger, a few slices of onion, a few leaves of cilantro, spread some of the aioli on the top bun, then place on burger.
          Avocado Aioli
          • 1 very ripe avocado
          • 1 1/2 habanero peppers, seeded and minced
          • 1/4 scant C mayonnaise
          • 2 garlic cloves, minced
          • 2 T fresh cilantro
          • 1/2 lime, juiced
          1. Scoop the flesh of the avocado and add it, along with all remaining ingredients, into a blender or food processor. Blend until smooth.
          2. Check for seasoning. 
          Source: Food52

          You might also like: Lamb Gyro Burgers

          Friday, July 25, 2014

          Homemade French Onion Dip

          There is absolutely a time and place for onion dip made with an envelope or two of onion soup mix and a tub of sour cream. Throw in a bag of Ruffle potato chips and you've got yourself a hell of a party.

          But with just a handful of common ingredients and less than an hour's time, you can take onion dip to an entirely new level. Cream cheese adds richness while the freshly caramelized onions bring a sweetness and complexity that you just can't get from an envelope of dehydrated onions and some dry seasoning.


          We had plenty of leftovers (since I made it for just the two of us), but the dip held up well in the refrigerator for several days. It was best if left at room temperature for a few minutes, though, to loosen up a bit.

          Ingredients
          • large red onions
          • 1 T olive oil
          • Salt
          • 2 tsp chopped fresh thyme leaves
          • 2 tsp granulated sugar
          • 1/4 C white wine or dry vermouth
          • 12 oz. cream cheese, at room temperature
          • 1/2 C sour cream
          Method

          1. First, make the onion jam. Peel and slice the onions into fine half-moons. Place them into a wide heavy-based pan, along with the olive oil, and sweat over a medium-low heat until they begin to caramelize and brown, about 15 minutes.
          2. Add the thyme leaves and granulated sugar to the pan, and cook for another 3 to 4 minutes, until the sugar is melted and the onions are well caramelized.
          3. Pour the white wine or vermouth into the pan, and working quickly, stir and scrape any sticky, browned bits from the bottom of the pan. Keep stirring and scraping until the pan is basically clean, and the liquid has completely evaporated. Turn off the heat, and set aside to cool.
          4. To make the dip, beat the cream cheese (either with a wooden spoon or with an electric mixer) until it is completely smooth. Add the sour cream and beat again until smooth, thick and combined.
          5. Add the cooled onion jam and mix the two together, reserving about a tablespoon of the onions, diced, for garnish. 
          6. Try not to eat the entire dish of dip in one serving.
          Source: Food 52

          And, if you like caramelized onions as much as I do, check out this Caramelized Onion and White Bean dip


          Sunday, July 20, 2014

          Coconut Banana Bread

          While traditional banana bread says to me cool mornings and hot tea, Thanksgiving, and crunchy leaves, this more tropical version sings summertime. The flavors of coconut, bananas, rum and lime reminded me of breakfast in Key West...and there's nothing wrong with that!


          Ingredients
          •  2 C all-purpose flour 
          • 3/4 tsp baking soda
          • 1/2 tsp salt
          • 1 C granulated sugar
          • 1/4 C butter, softened
          • 2 large eggs
          • 1 1/2 C mashed ripe banana (about 3 bananas)
          • 1/4 C plain low-fat yogurt
          • 3 T dark rum
          • 1/2 tsp vanilla extract
          • Zest of half a lime
          • 1/2 C flaked sweetened coconut
          • 1/2 C nuts (I used up some chopped walnuts and pecans I had on hand), optional
          • Cooking spray
          • 1 T flaked sweetened coconut
          Method
          1. Preheat oven to 350°.
          2. Lightly spoon flour into dry measuring cups; level with a knife. Combine flour, baking soda, and salt, stirring with a whisk.
          3. Place granulated sugar and butter in a large bowl; beat with a mixer at medium speed until well blended. Add eggs, 1 at a time, beating well after each addition. Add banana, yogurt, rum, vanilla, and lime zest; beat until blended. Add flour mixture; beat at low speed just until moist. Stir in 1/2 cup coconut and nuts, if using. Spoon batter into a 9 x 5-inch loaf pan coated with cooking spray; sprinkle with 1 tablespoon coconut. Bake at 350° for 1 hour or until a wooden pick inserted in center comes out clean. Cool in pan 10 minutes on a wire rack; remove from pan. 
          4. Optional: The original recipe also called for a glaze, but I suspected the bread would be sweet enough without it - and for our taste, it was. Instead, I mixed some lime zest into the batter for the citrusy kick. But if you'd like to try it, just combine 1/2 C powdered sugar and 
            1 1/2 T fresh lime or lemon juice, stirring with a whisk; drizzle over warm bread. 
          5. Cool completely on wire rack.
          Source: My Recipes


          Saturday, July 19, 2014

          Lamb Gyro Burgers

          After fighting with the interwebs with no success, I've given in and just started a new blog. All the recipes on the original Thyme Well Spent are accessible through the blog list over there to the right - it's the link at the top of the list. It was time for a refresh, anyway, and I hope you enjoy More Thyme Well Spent!

          After a couple of summer months of traditional hamburgers on the grill, this lamb burger was a really nice change. There is a ton of flavor from a relatively short list of ingredients - most of which I had on hand. The cool tang of the sauce, the briny saltiness of the feta and the freshness of the veggies all go perfectly with the hot-off-the grill juicy burger. It might be my new favorite cook-out dinner!


          Ingredients

          Burgers:

          • 2 cloves garlic, minced
          • 1 shallot, minced
          • 1 lb. ground lamb
          • dash cumin and lemon zest
          Tzatziki Sauce
          • 1/2 C plain Greek yogurt
          • 2 T sour cream
          • 2 T cucumber, peeled and minced
          • 2 T lemon juice
          • dash cumin and coriander
          Topping
          • 2 hamburger buns
          • 2 oz. feta cheese (2 slices from block of feta)
          • 2 large tomato slices
          • 2 large red onion slices
          Method
          1. Mix garlic, shallot, lamb, cumin and lemon zest in a bowl. Form into two patties. Cover and place in the fridge while preparing tzatziki sauce.
          2. Mix tzatziki sauce ingredients in a bowl.
          3. Heat grill and cook the burger to desired doneness. Build burgers with buns and toppings.
          Source: Men's Fitness